
Automation and other time-saving processes are the key to creating a seamless and more satisfying experiences for customers and end users. As a bonus, automation and other time-saving processes can also make life easier on companies and their team members. This is particularly true in ecommerce fulfillment.
One reason a shipping API can be so beneficial is that it provides a consistent protocol for various platforms and softwares to “speak” to one another.
But, there are additional methods you can use to automate the flow of data to and from your API. Webhooks are an increasingly popular use case among developers, due to their potential applications and ease of implementation.
In this post, we’ll demonstrate how to use tracking webhooks to fuel real-time tracking notifications for your customers in an effort to improve their overall fulfillment experience. But, first, for those who aren’t familiar, let’s dive into what a webhook is and how webhooks can help optimize and automate your logistics processes.
What is a Webhook?
By definition, a webhook is a user-defined HTTP callback triggered by a specified event.
Webhooks are much like push notifications from an app on your phone. Say you’re out running errands and you happen to stop near a Walgreens or Starbucks. Your GPS location triggers the app to send a prompt to your phone asking if you want to open the app to scan your loyalty barcode. Webhooks are also similar to RSS feeds, automatically pulling your favorite blogs and news into one spot.
Webhooks are custom callbacks with automated messages sent from other applications and platforms when a requested event takes place. They communicate the payload (or requested data) from one source to a specified URL. The only other way to fetch this data between applications is through polling.
Polling vs. Webhooks
Before we get into the specific differences, let’s describe a scenario most have likely experienced as a consumer. You ordered a new product, and the seller has sent the confirmation email with a link to track the shipment. Anxiously awaiting your package, you return to the link daily to re-check the progress — perhaps even keeping a tab open in your browser so you can refresh the tracking link frequently. With each refresh, you are essentially polling the carrier API to request updates on your package.
Polling and webhooks are both capable of retrieving the same data from an API. But the biggest difference is that there are typically limits on polling an API transaction. If you’ve ever received a 429 error while shipping and tracking packages in high volumes, it’s likely that you were making too many polling calls to the API. Not to mention, polling is either a very manual process or incredibly labor-intensive for developers to automate on the backend.
A webhook simply subscribes you to the new calls and responses relevant to your request. With added real-time capability and the ease of implementation, webhooks provide a significant edge over traditional API polling.
What Are The Benefits of a Tracking Webhook?
Since webhooks allow the ShipEngine servers to contact your servers directly, they are a popular solution for many of our ecommerce users who are looking for a way to trigger real-time tracking push notifications to their customers. This gives them the power to create a better fulfillment experience by providing real-time visibility on where a customer’s order is, all in a branded tracking environment.
It also creates a wealth of opportunities when it comes to innovative ways to improve your processes and workflows throughout the order lifecycle. By building out what is known as a “Webhook listener,” your integrations developer can create a number of trigger processes through a tracking event webhook. See the next section for examples.
Other Ways You Can Use Webhooks to Optimize Your Fulfillment Process:
- Want to improve the returns process for your customers? Use a tracking webhook to trigger a thank you email with return policy information after an order has been delivered so that customers don’t end up in your chat queue.
- Want a detailed report on your undeliverable or delayed shipments? Use tracking webhooks to gather real-time data that can help influence decisions about your shipping workflow in real-time.
- Want to improve your internal process for returns? Use a tracking webhook to trigger processes in your warehouse when a pay-on-use return label is scanned.
To help further visualize the potential fulfillment workflow optimizations that webhooks could bring to your business, here is a complete list of events you can request from the ShipEngine API.
Subscribing to updates in ShipEngine through a webhook is not a difficult process, and we have aimed to make this feature as accessible as possible. In addition to the full guide on tracking webhooks in our documentation, we have also put together a quick demo video (see below) on how to test and inspect tracking webhooks in a code-free environment using RequestBin. RequestBin is a great tool for seeing how webhooks work and verifying that you are getting events before investing in development.
How to Test a Tracking Webhook Event in ShipEngine Through RequestBin
Essentially, to run this test, you will be providing your webhook URL and then assigning an event in the ShipEngine dashboard that will trigger the webhook. In order to run this test, you will need to have our Postman Reference Collection downloaded, and make sure your carrier accounts have been connected within your ShipEngine dashboard.
Please also note that webhooks must be created using your production API key and only one webhook can exist for each event. Multiple webhooks for the same event are not supported and will cause an HTTP 409 conflict error.
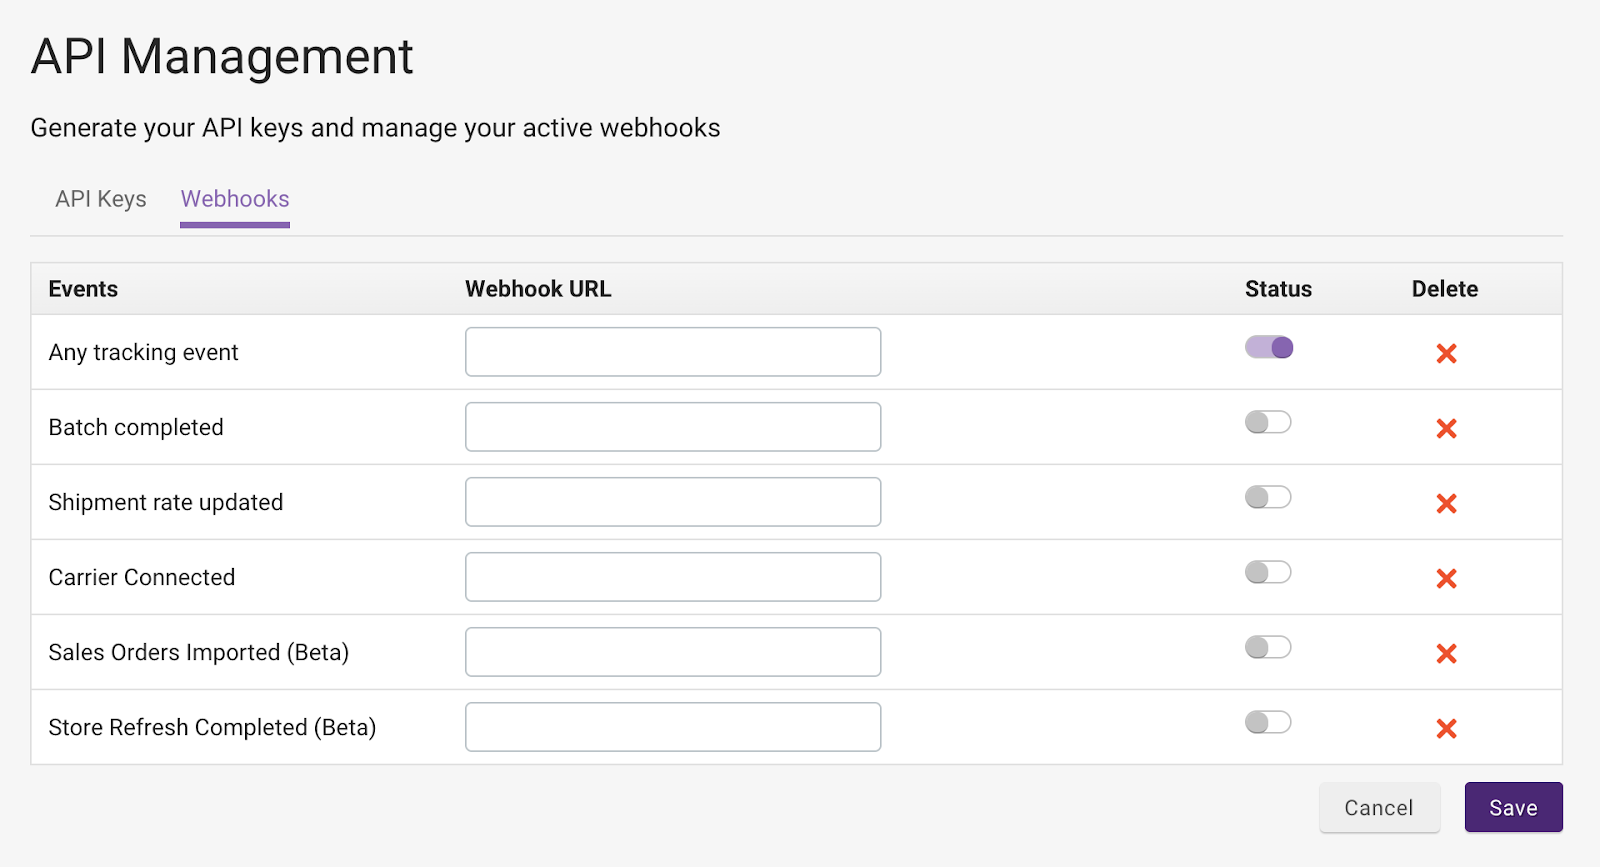
Once you have generated your webhook URL through RequestBin, you will need to add it into your ShipEngine dashboard so that our API can start pushing tracking updates to your webhook address. To do this, follow these steps:
- Log into the ShipEngine Dashboard.
- Select API Management.
- Select the webhooks tab.
- Add your webhook URL to the “Any Tracking Event” row, and toggle the status to “On”.
- Copy, or collect your Carrier IDs from the “Connections” tab.
Once you have successfully added your tracking webhook to your ShipEngine account, open Postman and navigate to the labels
For reference on how to build out a tracking webhook listener, read the step-by-step guide in our documentation.
Frequently Asked Questions About Tracking Webhooks
How many times will ShipEngine attempt to deliver the webhook event to my URL endpoint?
Webhook delivery will be attempted 3 times with a 2-hour delay between each attempt. After these attempts, it will be discarded.
What HTTP status code do I need to return?
Once you’ve successfully received the webhook, you should respond with an HTTP 2XX status code, such as 200 (OK) or 204 (No Content). If you respond with a non-2XX code, ShipEngine will assume there was an error and will retry the webhook delivery later.
How can I contact support with more questions?
Head over to our support resources page for ways to contact our team directly. All ShipEngine users have access to 24-hour chat support Monday through Friday, as well as email support during business hours.
If you’re looking for a way to optimize your shipping workflow by automating the way you print shipping labels, validate addresses, get shipping rates, and provide real-time tracking updates to your customers, we encourage you to sign up for your free API key. Solve shipping for your business, and improve your fulfillment experience with ShipEngine.
About Author

Leave a Reply