
Creating a Webhook Listener
As described in our [Setting Up Webhooks](/webhooks guide), testing webhooks using RequestBin.com is a great way to get started with using and understanding webhooks.
It provides temporary URLs that you can register through the ShipStation API dashboard or by using the v1/environment/webhooks endpoint.
When using ShipStation API in a production environment, you will need to provide a more robust web service to host your own custom endpoints. This guide walks you through creating a simple web application that exposes an endpoint you can use to subscribe to ShipStation API batch webhooks.
We will be developing a web application that listens for webhook requests, often called a webhook listener. Our application will run a web server and listen for HTTP POST requests on a specified endpoint. This example is written in JavaScript/NodeJS and uses the express web framework. Once we receive a webhook indicating that a batch has completed processing, we will make a series of calls the to ShipStation API to download the labels. For this we will be using an HTTP client called axios.
Requirements
To follow along with the steps in this guide, you will need to do the following:
- Install NodeJS per the site's instructions. Likewise, you can use other package managers, such as Homebrew on macOS or Linux, and Chocolatey for Windows.
- Verify that npm was installed successfully along with NodeJS by running the following command from a terminal:
npm -v. - Clone the code-samples repo.
- Open an editor where you can write and run code. We will be using Visual Studio Code in this guide, but you can use any editor you are comfortable with.
- In VS Code, select File in the menu bar at the top and then select Open Folder.
- Navigate to the directory where you cloned the repo and select
code-samples/node-webhook-listener-batch. - Click the Select button.
Install Dependencies
We will be using several external NPM packages in our web application, such as express and axios. These are known as dependencies. We could install each package individually by running npm install <package name>. However, it is customary to provide a package.json file in the root of your project that lists all the project's dependencies as well as other identifying information about the application. This facilitates installation since all dependencies for all files in the project are listed in a central location and can all be installed at once with a single command.
Open a terminal in the node-webhook-listener-batch directory and run the following command: npm install.
This command installs the dependencies we listed in thepackage.json file and creates a package.json.lock file to nail down the specific versions installed since the package.json file allows us to specify minimum versions.
TIP:
Open a Terminal
You can access a terminal directly from Visual Studio Code. Click Terminal on the menu bar and select New and a terminal will open up at the bottom of your screen.
Import Dependencies
We've now installed all the dependencies required for this application, and we are ready to take a look at the code, which resides in the index.js file.
We start by importing the tools and frameworks mentioned above, as well as a few others, at the top of our file. The code below includes all the packages needed by this application. We will be using express, which is a web framework that provides the web server we are using. We will configure express to use the body-parser package so that we can access the data in the requests sent to the endpoint. We will use axios to make HTTP requests to the ShipStation API, and we will use fs and path to write the downloaded label to the file system.
You may have noticed that the package.json did not list fs or path. That's because these are core NodeJS modules that do not need to be installed separately. We do, however, still need to import them before we can use them in our application.
Create the Web Application
At this point, we have specified and installed dependencies, and we are ready to create our web application and define endpoints. When you configure webhooks in ShipStation API, you provide a URL to which ShipStation API will send an HTTP POST request with a JSON payload whenever a particular event occurs. We recommend that you create an individual endpoint for each type of webhook you wish to subscribe to and limit traffic on those endpoints to ShipStation API webhook traffic.
The code below creates an instance of an express web server and assigns it to the app variable. We then configure our express application to use the body-parser package. Since we called the variable bodyParser in the import statement above, that's how we reference it in the code below. The last line of code starts the server, listening on port 3000 for incoming requests. This line is customarily the last one in the script. We will be filling in our endpoint implementation in the space between.
Create the /batch Endpoint
We now have a very simple web application called app, but we have not defined any endpoints for our application.
In this example, we are going to create a /batch endpoint to use for batch event webhooks.
One of the benefits of developing and hosting your own web application is that you can programmatically trigger other events to occur once you receive the webhook, which we'll demonstrate in our example endpoints.
Let's start by taking a look at the payload we expect to receive on this endpoint.
Sample Batch Webhook Payload
You can see from the example above that the batch webhook payload includes a resource_url. We can use this URL to get more information about the batch and ultimately download the labels.
The code below is an example implementation of an endpoint that listens for HTTP POST requests. We do this by making a call to the app.post method of our express server instance. The first parameter we pass to the app.post method is the path we want to use for the endpoint, in this case /batch. The second parameter is a callback function.
If you need more context on asynchronous programming and callback functions, check out this reference. The app.post method is asynchronous, meaning that the program does not wait for this call to return before moving to the next line of code in the file. Instead, we pass a callback function as the second parameter to tell the app.post method what to do when it completes. In this case, we define the callback function directly in the call to app.post. This is known as an anonymous function.
Notice that the anonymous callback function has the async keyword in front of the parameters.
We declare this function as async because we will be using the async/await syntax in our axios calls, and this syntax can only be used in asynchronous functions. If you need more context around using async/await, this is a great reference. Once the endpoint receives a request, it invokes the callback function.
When we receive a request on this endpoint, we first extract the resource_url from the request body sent in the webhook request. We have access to this data on the request object because we configured the application to use the body-parser package.
Finally, we send a 200 HTTP status code to terminate the call and return program control to the main application. Whenever ShipStation API sends a tracking event webhook to your /batch endpoint, this code will be called.
We then use axios, a Promise-based HTTP client, to send an HTTP GET request to the resource_url we extracted. We use the await keyword to indicate that the application should wait until the HTTP request is complete before continuing with the rest of the program.
At this point, we make a call to the ShipStation API, so we need to provide an api-key header in the HTTP request to identify ourselves as having access to this batch. The code below references a variable called API_KEY, which is declared at the top of the file. You will need to set this variable to a valid API key for your account before running this application. Refer to our Security & Authentication guide if you need a more information.
We performed a GET request, by setting method: 'get' in the axios configuration. We also told the axios client what sort of data we expect to receive from this request by setting the responseType to application/json. Finally, we included the URL we wish to access, which we stored in the resourceUrl variable, and add our API key as an HTTP header. The response from this
HTTP request is stored in the resourceUrlResponse variable, which we will use further along in the application.
Once we perform a GET request on the resource_url, we get a response similar to the following.
You can see it includes a list of URLs from which we can download our completed labels.
Sample Resource URL Response
We next extract the label_download.pdf URL from the labelUrlResponse variable, which contains the HTTP response for the resourceUrl, and use the axios HTTP client to perform a GET on this URL. However, this time we set the client's responseType property to stream rather than application/json since we will be receiving binary data that we want to save to the file system. Again, we include the URL we wish to access and add our API key as an HTTP header. We also set the batchId variable to the batch ID we extract from the response.
Finally, we write the contents of the label file that were streamed above to a file on the file system once the request completes. We use the batchId variable, which contains the batch ID we extracted from the response payload above, to create a unique file name and to identify the batch that these labels came from.
This first few lines creates the labels directory. We enclose this in a try/catch block in case the folder already exists.
Line 10 specifies the path to the file we wish to create to hold the downloaded label, and line 11 creates a writeable stream that can write the contents to the file just created on the file system. The last two lines write the data on the stream to the file on the file system in incremental chunks. Using a stream is more efficient on RAM usage when downloading a large batch of labels since the data is read into memory and written to the file system in chunks rather than reading the entire file into memory before writing it to the file system.
Putting It All Together
We have now performed the following:
- Cloned the repo.
- Installed the packages using
npm install. - Created import statements for the packages we want to use in our application.
- Created an
expressweb application that listens for requests on port3000. - Created an endpoint to use for batch processing events.
The complete script for the /batch endpoint is included below. If you cloned our code-samples repository, you will find this example application in the node-webhook-listener-batch directory.
Running the Webhook Listener
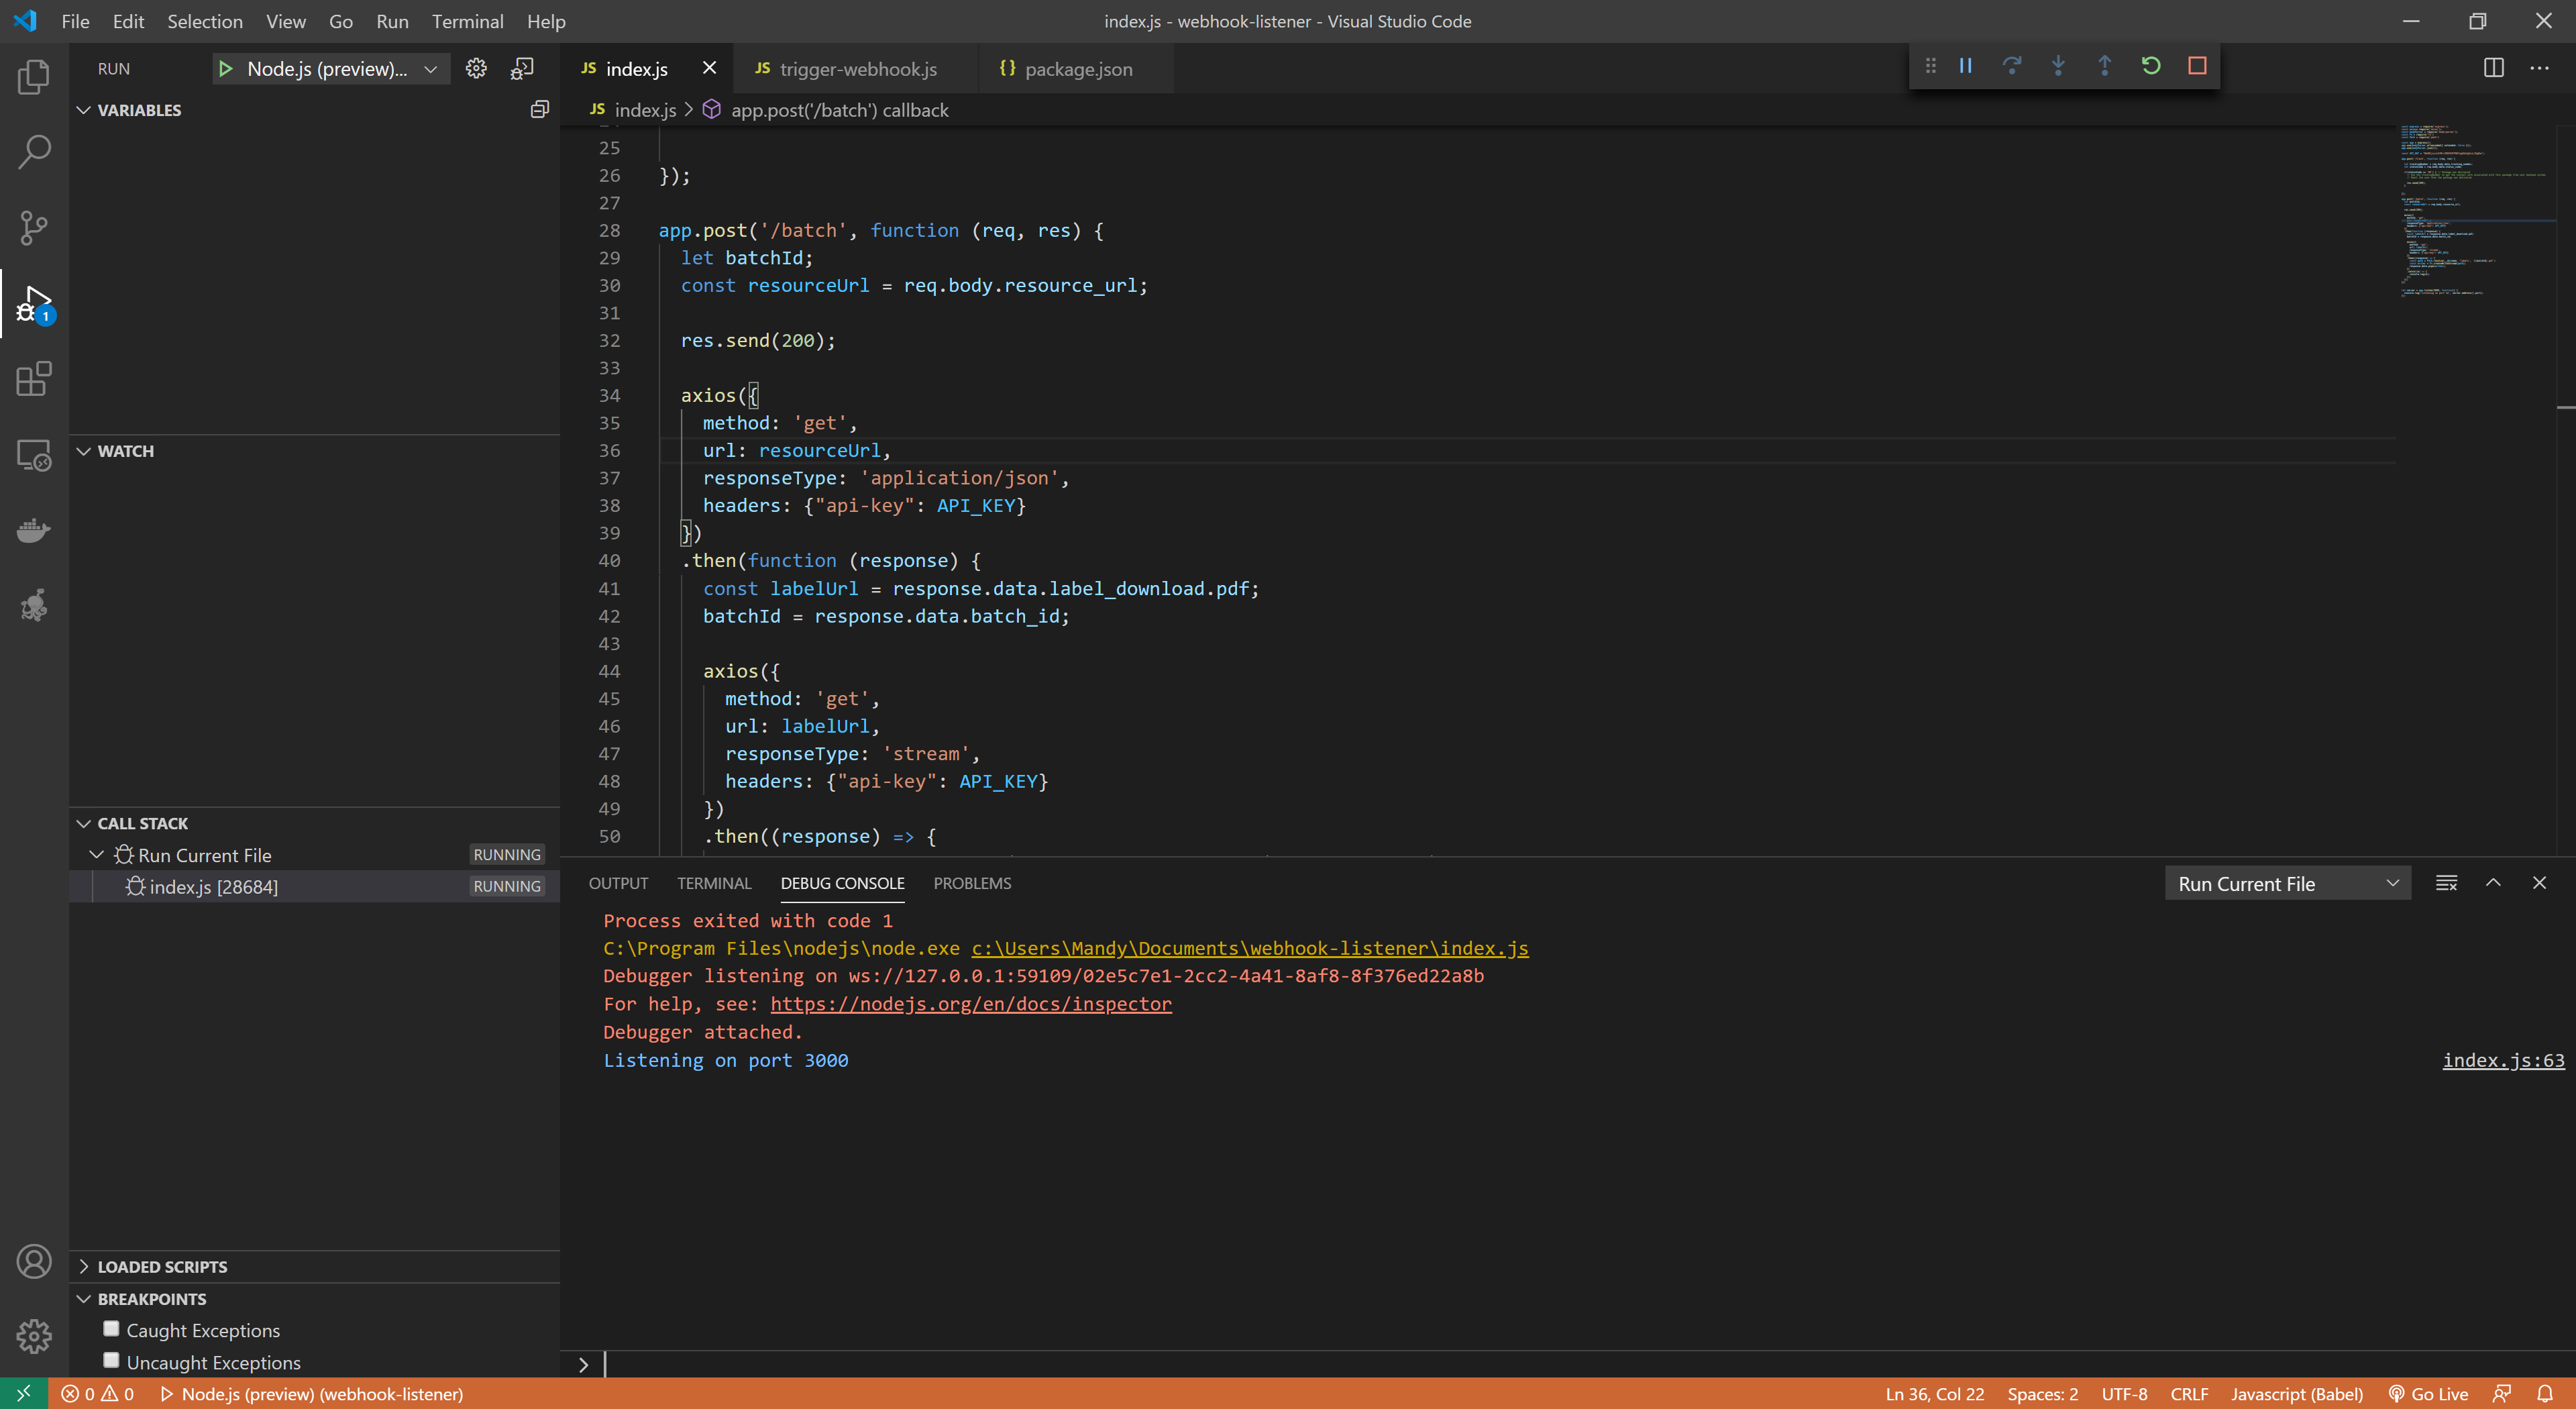
We have now written a web application that exposes a single endpoint. Let's start by running it locally to test it out. If you are developing in Visual Studio Code, follow these steps to run your application:
- Make sure
index.jsis open in Visual Studio Code - Click
Runin the top menu. - Select
Start Debugging - Selected
Node.jsin the environment drop-down list that is displayed. - You should see a debug window at the bottom of the screen. Your IDE should look similar to this.
Testing the Webhook Listener
Your application is now running! But let's test it out before we try to use it to receive webhook requests. Follow these steps to test that your application is working.
- Download and install Postman
- Open Postman
- Click the orange
Newbutton - Select
Request - Give your request a name and click
Save - Change the method type from
GETtoPOSTin the drop-down - Enter
http://localhost:3000/batchfor the URL - Select the
Bodytab - Change the type from
nonetorawin the drop-down box - Change the type from
TexttoJSONin the drop-down box - Copy the sample payload above and paste it into the request body
- Paste it into the body area
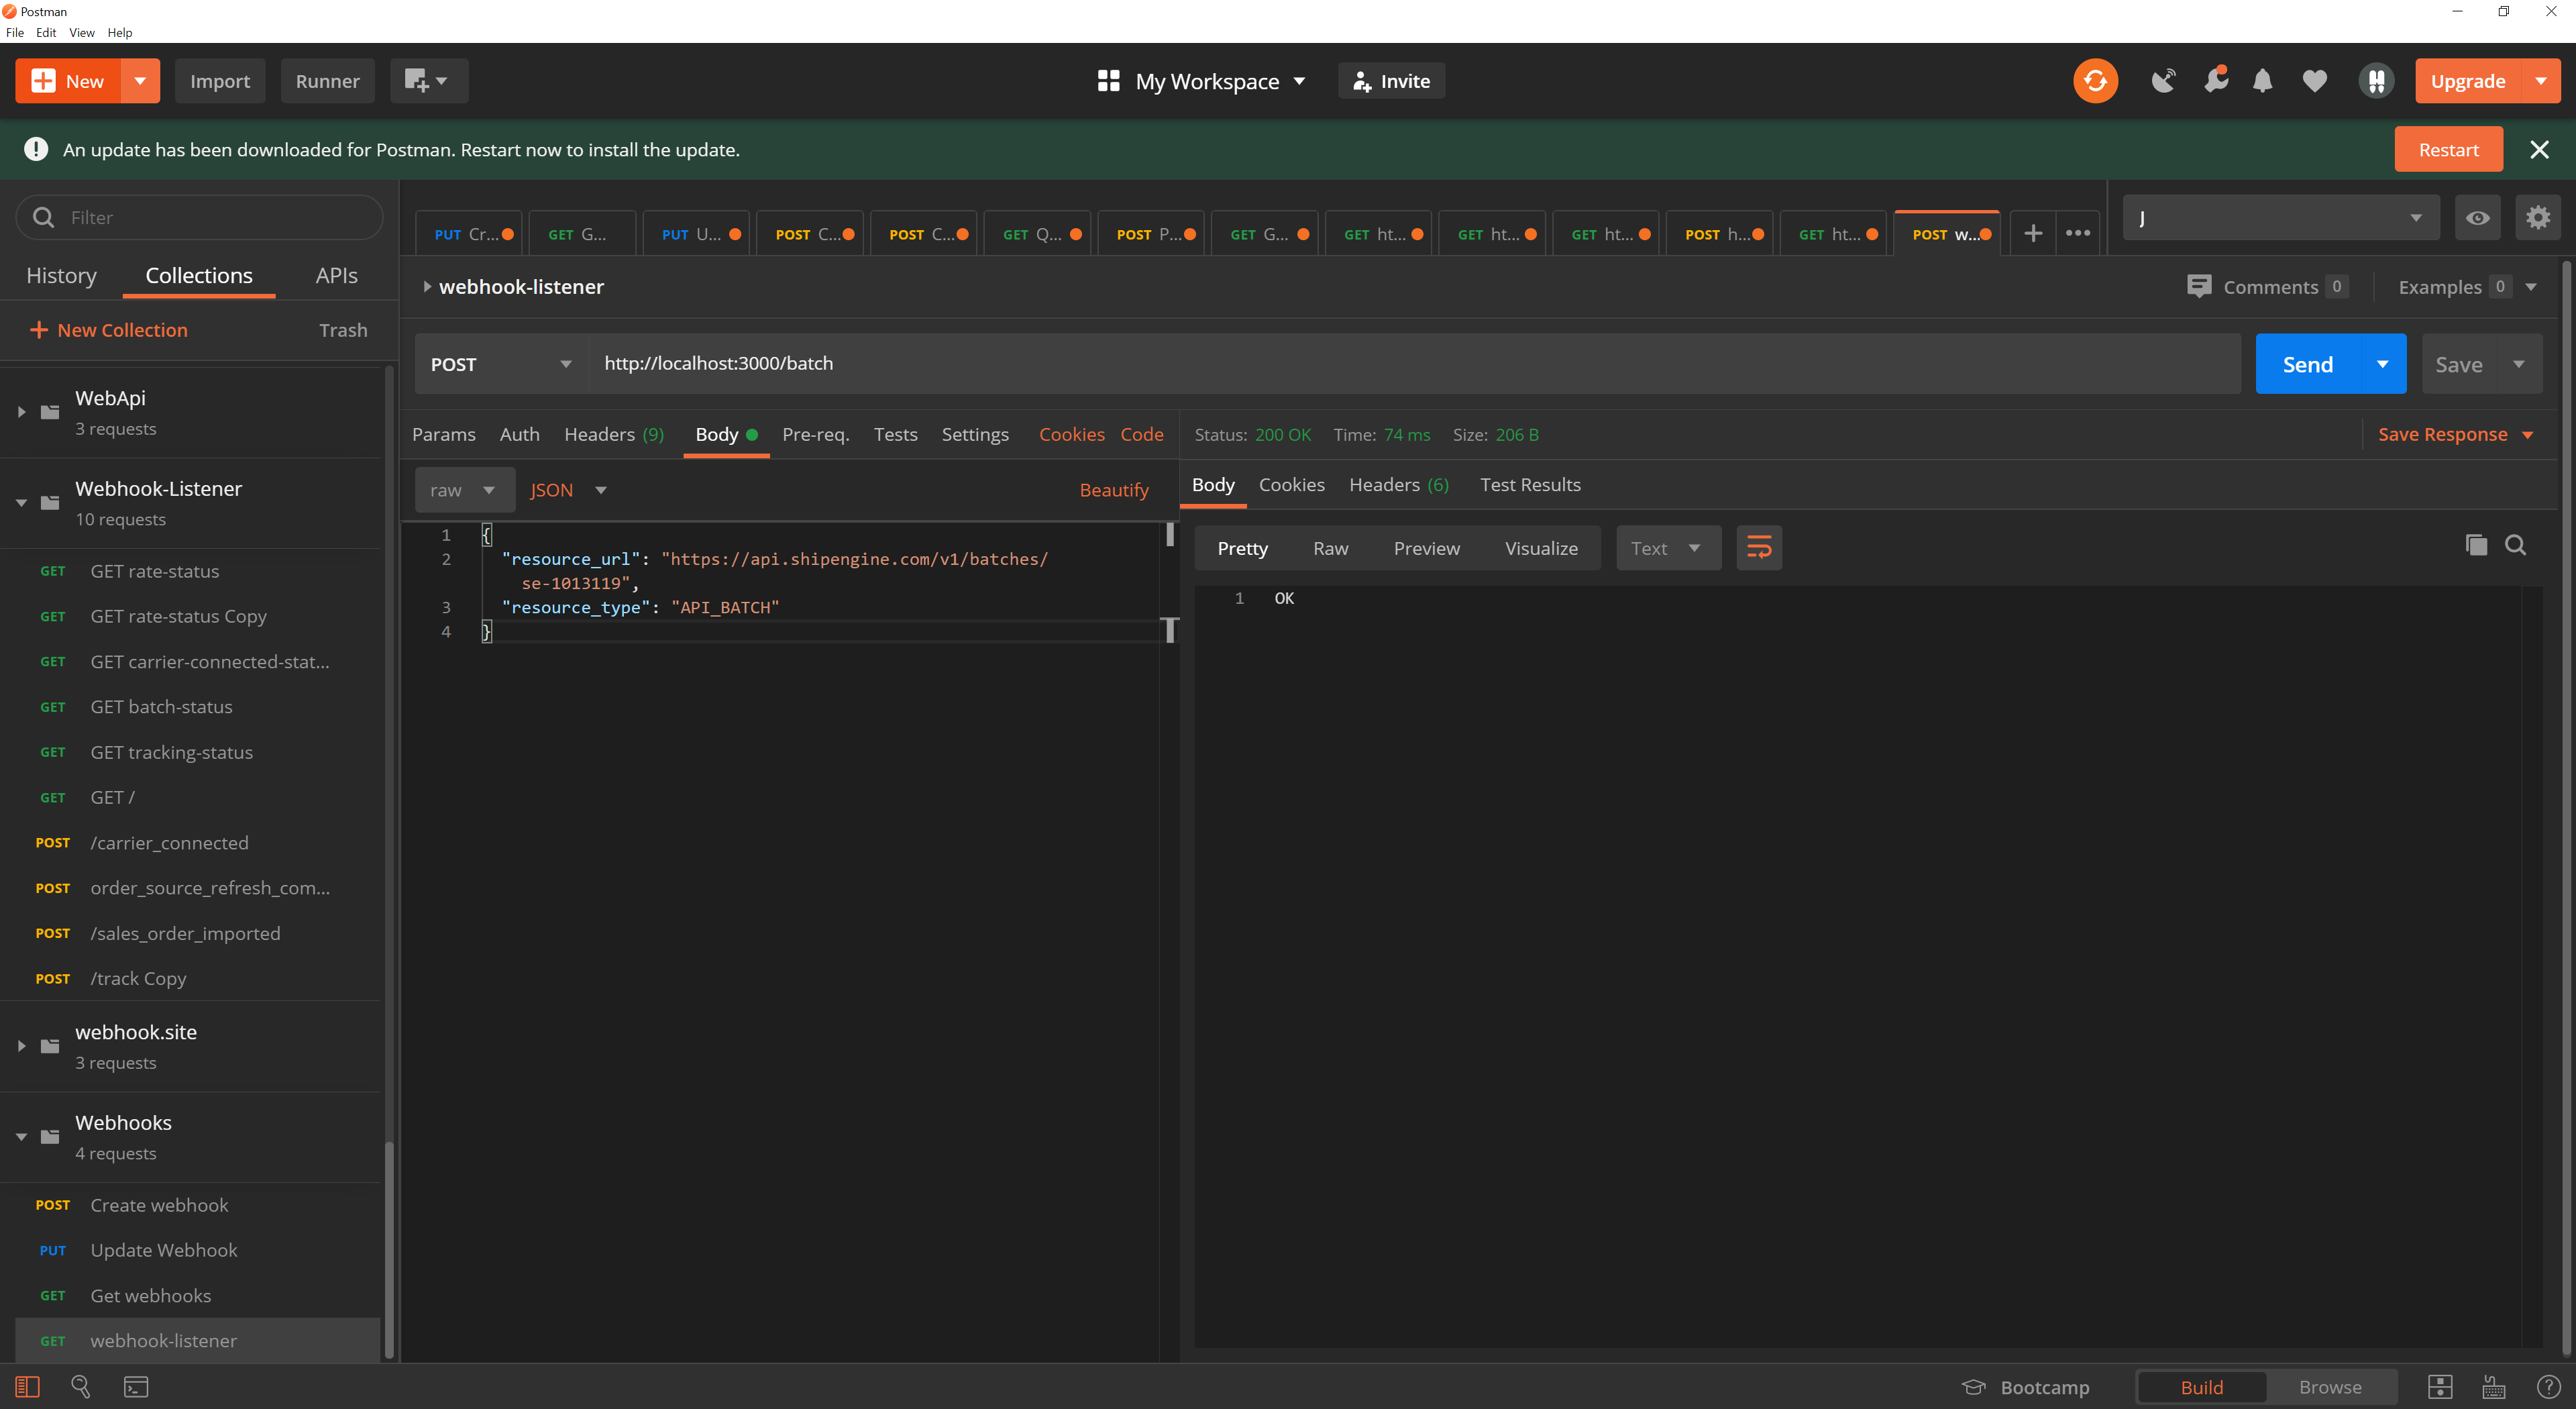
- Click the
Sendbutton. You should get a200HTTP status code and seeOKin the body. Your screen will look similar to this.
Validation
We got a successful response from Postman, but if you look at your VS Code debug console, you will see that an unhandled exception was thrown. Your VS Code console should look similar to the following:
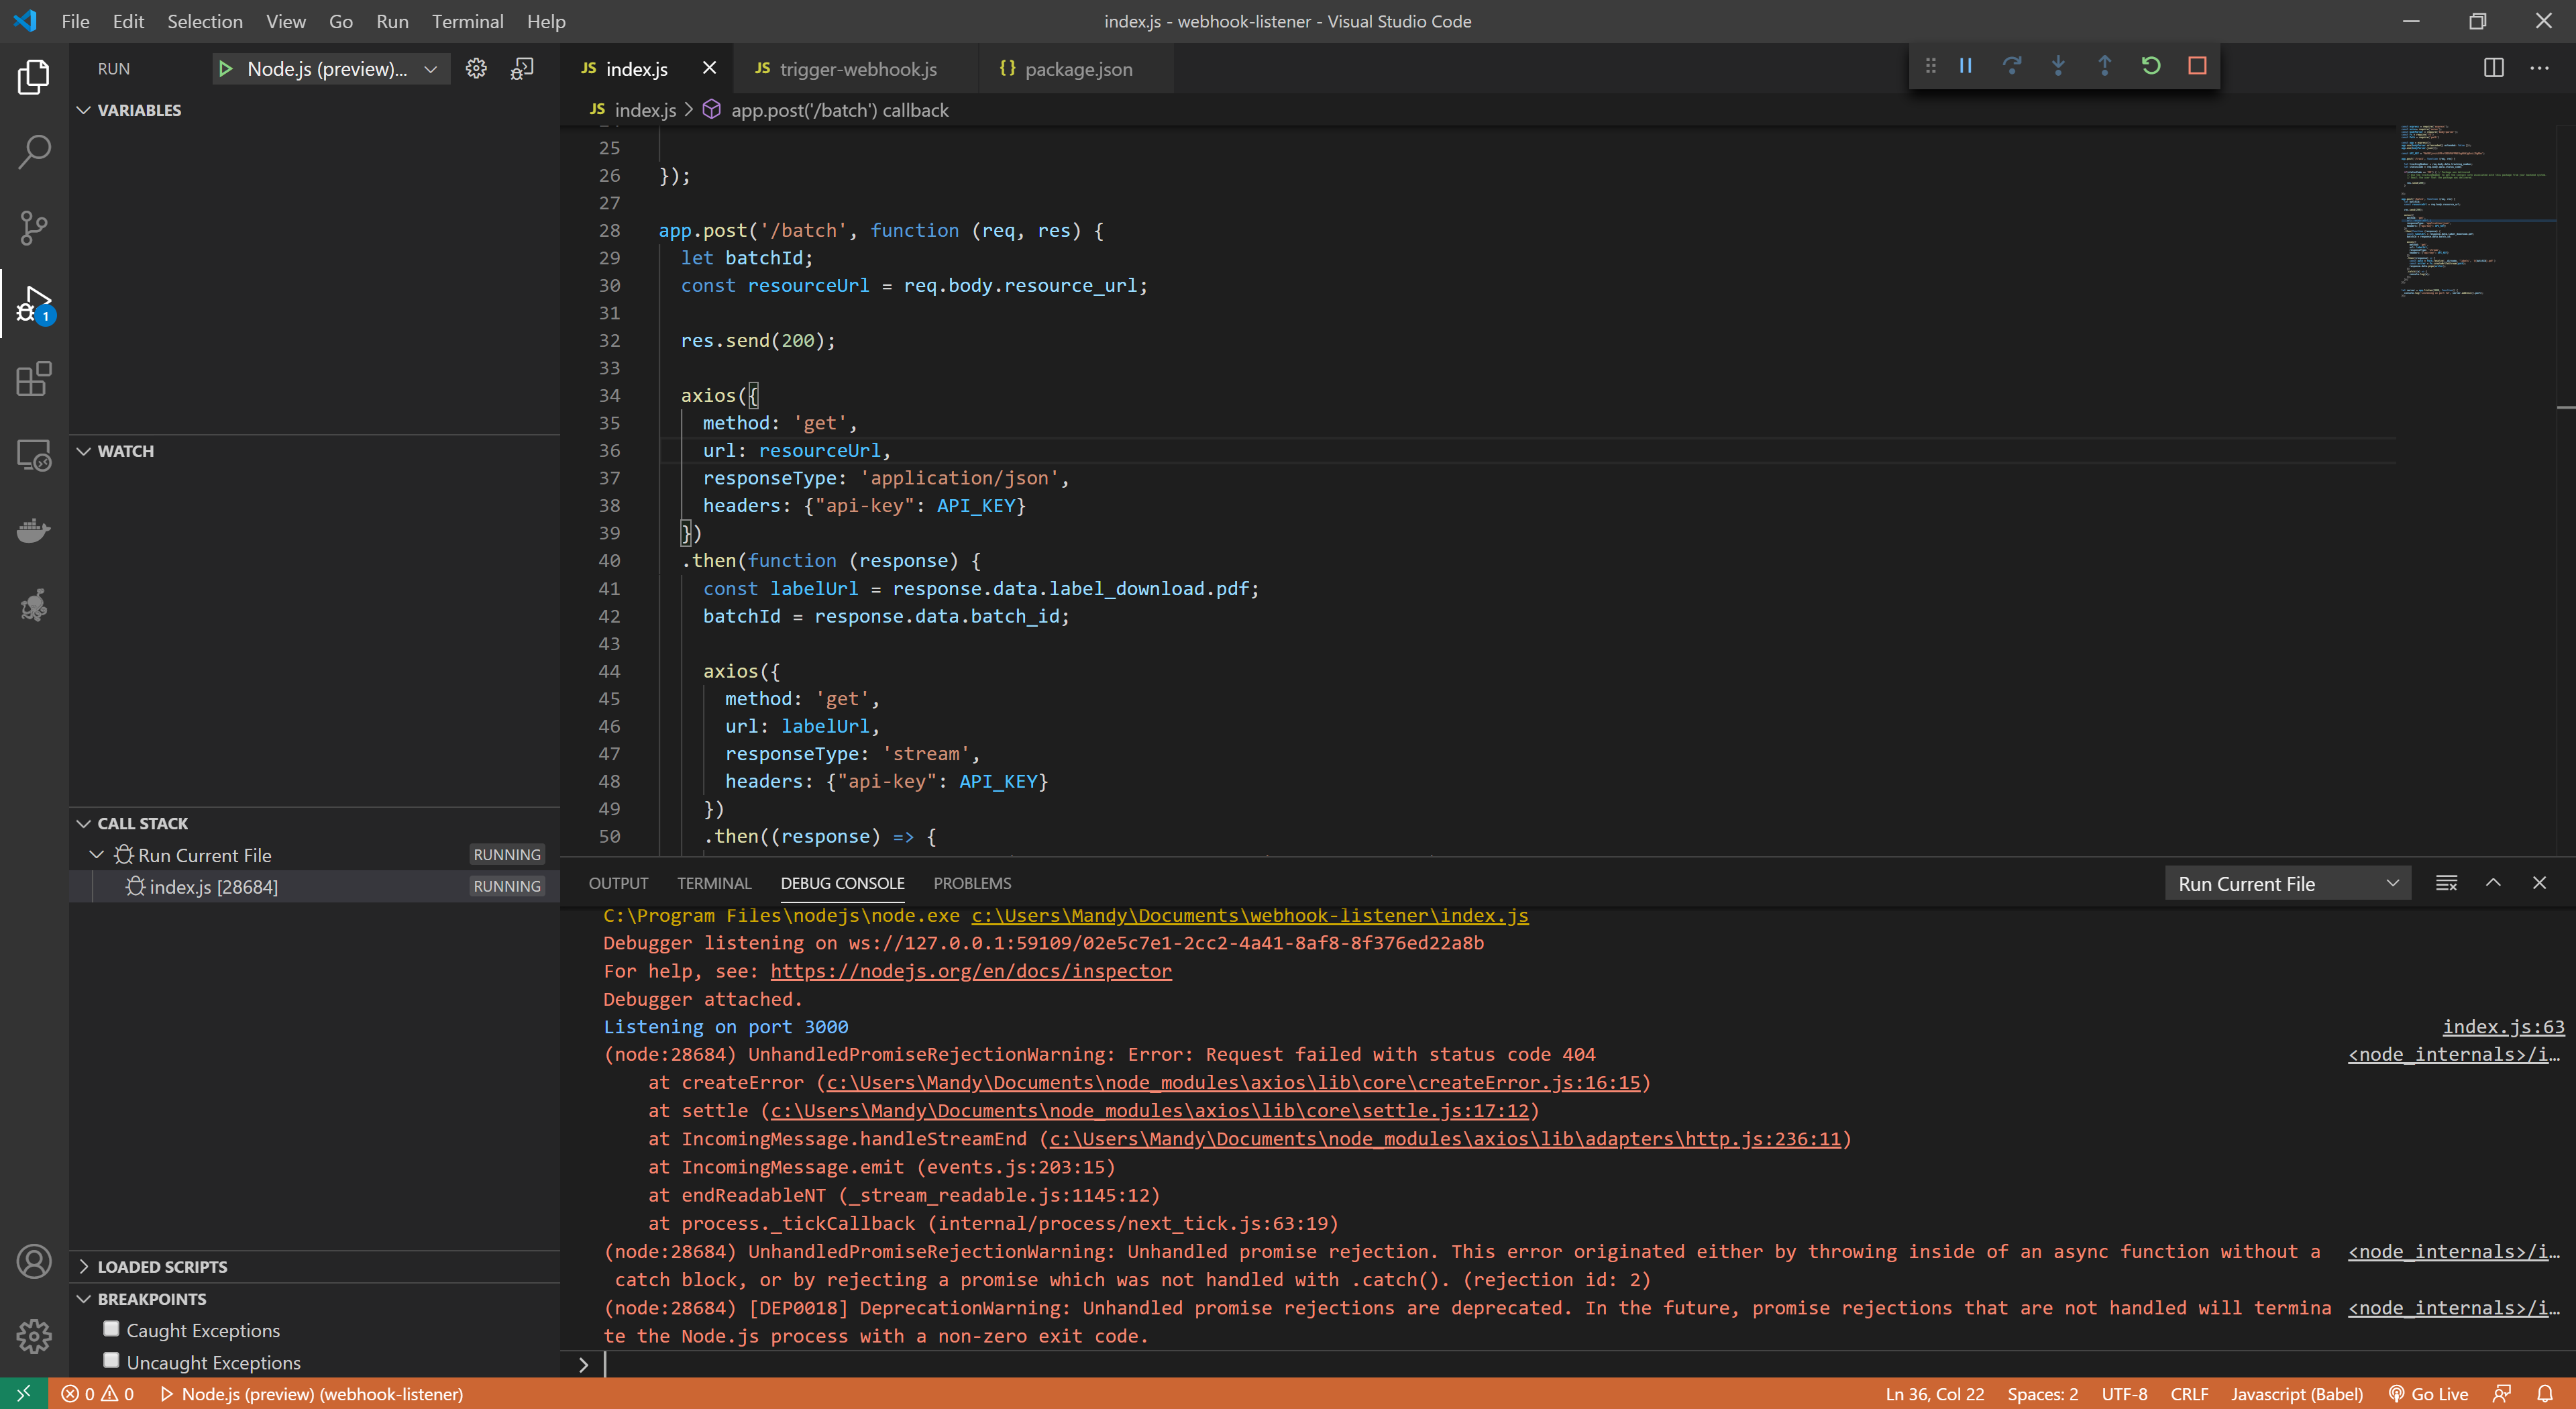
What's the problem? We sent back a 200 code, and then we hit errors further along in the code. We didn't add any logic in our application to check for and handle errors and expose those errors to the caller. In our case, the sample request payload includes a resource_url that belongs to another account, so we hit an authentication error when we tried to access that URL using our API key. This shouldn't happen with the live payloads this endpoint will receive from ShipStation API, but it does highlight the need to think through possible errors and exception handling before using your application in a production environment.
Before using the application in production, you will need check that the message is what you expect and only attempt to access those properties if you receive the correct message. Furthermore, you can check that requests received on your endpoint are coming from ShipStation API by inspecting the headers from within your endpoint. All requests coming from ShipStation API will have the user-agent header set to ShipEngine/v1.
Testing with Real Webhooks
We validated that our web application is working properly by sending a request to localhost via Postman. In order to test the application with actual webhook requests from ShipStation API, we will need to make it publicly accessible. There are several ways to do this for production, but for test purposes we will use ngrok to expose our web application so that ShipStation API can access it to send webhooks.
Follow these steps to test your application with ShipStation API:
- Download and install ngrok.
- Open a terminal and change to the directory where ngrok is installed.
- Run the following command:
ngrok http 3000. This tells ngrok that you want to expose port 3000 on your localhost. ngrok will response with something similar to this:

The command we ran above allows ngrok to forward HTTP traffic to localhost on port 3000. It generated a random, unique URL we can use to configure webhooks in ShipStation API. In the example above, this URL is http://f2ea123672fc.ngrok.io. You'll get a new URL each time you start ngrok, so this won't be a permanent configuration, but it will allow us to test that the web application is receiving and processing ShipStation API webhooks as expected.
Copy the URL that was generated when you ran the ngrok command and follow our webhooks guide to configure ShipStation API to use this URL. You will need to add the endpoint to the URL when you add it to ShipStation API. For example, given the URL generated above, we would use http://f2ea123672fc.ngrok.io/batch for the batch events, or "Batch Completed" if you are configuring from the dashboard.
Triggering the Webhook
Now that we have configured ShipStation API to send webhook requests whenever a batch event completes, let's perform the steps necessary to trigger a real webhook request.
Follow our Process a Batch guide to complete the steps necessary to process a batch and cause a batch webhook request to be sent. Alternately, you can use the trigger-webhooks.js script in our code samples repo to trigger the webhook. You can follow the readme for guidance.
Authentication
You may also wish to add security to your webhooks by using Basic Authentication. This would require you to supply the username and password directly in the URL as specified in the example below. It would prevent any traffic from reaching your endpoint that did not include the valid username and password in the URL.
Getting to Production
At this point, we have created a simple web application that listens for webhook requests on the /batch endpoint. We tested it locally by sending a sample webhook payload using Postman. We then tested it with live webhook traffic by using ngrok to publicly expose our web application so that ShipStation API could reach it. While this is a great approach to learning how to build a webhook
listener application, you will need a more permanent hosting solution before integrating your application into your production environment. There are additional steps you will need to take before you can configure ShipStation API to use the endpoints exposed by this application. Namely, you will need to host your application and make it publicly accessible so that ShipStation API can reach it.
If you have an existing web application that integrates with ShipStation API, then you should be familiar with the steps required to host your webhook listener application. If not, you'll probably need to start by registering a domain name for your application. You will then need to select a cloud provider, such as AWS, Azure, or GCP to host your application and provide DNS services for your application.
You might also use a web hosting service that handles domain registration, hosting, security, and other facets of web hosting for you.