
Setting Up Webhooks
ShipStation API allows you to subscribe to webhooks to receive real-time updates for long-running asynchronous operations. This allows your application to move on to other work while the operation is running rather than being blocked until it completes.
It also allows ShipStation API to push updates to your application rather than having your application continually poll for updates. For example, you may subscribe to the track webhook event to automatically receive an update anytime a tracking event occurs. Rather than continually sending a request to the /v1/labels/:label_id/track endpoint to see if the tracking information has been updated since the last time you checked, you can subscribe to the track webhook event and ShipStation API will push the notification to your application via a webhook whenever the tracking details are updated.
Configuring Webhooks
Before you can begin receiving webhooks, you must configure your ShipStation API account with the HTTP endpoints you'd like for the webhooks to be sent to. You can do this through the ShipStation API Dashboard or through the API.
Requirements
You must be in the Production environment of the ShipStation API dashboard to set up webhooks.
Configure Using the Dashboard
- Log in to your account Dashboard.
- Go to Developer, then Webhooks.
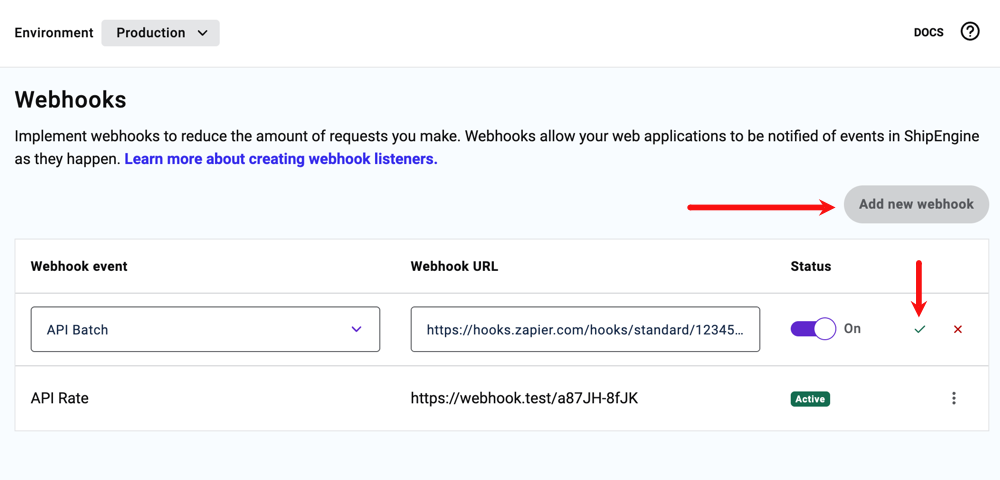
- Click the Add New Webhook button.
- Select your Webhook Event and enter your Webhook URL. You can set up multiple URLs for the same Event.
- Click the green checkmark icon to save your webhook.
Configure Using the API
To configure a webhook using the API, you'll need to provide a url and an event that will trigger the webhook. You'll send this data using the POST method to /v1/environments/webhooks. You may only configure one URL per event.
NOTE:
HTTP 409 Conflict
If you create a webhook for an event that already exists, you'll receive an HTTP 409 Conflict error when your request is sent. If this occurs, be sure to review the list of webhooks and delete the existing webhook for the event before resubmitting your request.
The payload for each type of webhook event will have a unique resource_type which indicates which type of event triggered the webhook.
You can use the following event names and corresponding resource types in your payload when you configure a webhook through the API:
| Description | Event | Resource Type |
|---|---|---|
| Batch completed | batch | API_BATCH |
| Shipment rate updated | rate | API_RATE |
| Any tracking event | track | API_TRACK |
| Carrier connected | carrier_connected | API_CARRIER_CONNECTED |
| Sales Orders imported (Beta) | sales_orders_imported | API_SALES_ORDERS_IMPORTED |
| Order Source refresh complete (Beta) | order_source_refresh_complete | API_ORDER_SOURCE_REFRESH_COMPLETE |
| A requested report is ready | report_complete | API_REPORT_COMPLETE |
Example Request
This example uses a batch event.
POST /v1/environment/webhooks
Testing Webhooks
You can use a service like Webhook.site to create temporary URLs to receive webhooks. It will allow you to observe any HTTP requests the temporary URL receives. This will allow you to see the exact payload and headers sent from our system, before your application is ready to accept it. Make sure to unregister the webhook after your testing is complete.
Validating Webhooks
ShipStation includes a digital signature (RSA-SHA256) in all outgoing webhooks. This allows you to ensure requests received at your webhook URL were sent from our systems.
We have a full code example that demonstrates the steps.
Step 1: Extract the Signature Headers
Extract the three signature headers from the incoming webhook request:
x-shipengine-rsa-sha256-key-idx-shipengine-rsa-sha256-signaturex-shipengine-timestamp
If these headers are not present, you should respond with an HTTP status 404
and stop processing the request. This can help hide the existence of your
webhook endpoint from anyone attempting to impersonate our service.
Step 2: Validate the Timestamp
Verify that the timestamp in the x-shipengine-timestamp header is recent,
in order to prevent replay attacks. Use your judgement on the age of webhooks
you are willing to accept. Note that because of different server time skews, you may
receive webhooks with timestamps in the future, so your code should account for that.
If the timestamp header is more than 5 minutes difference from the current
time, you may want to respond with an HTTP status 400 and stop processing the request.
If you encounter a lot of these rejections, you may want to double-check your server clocks, or
increase the time range.
Step 3: Get the Raw Request Body
Important: You must use the raw, unparsed request body exactly as received. Do not parse the JSON first and then re-serialize it, as this may change whitespace, property ordering, or encoding, which will cause signature verification to fail. Ensure your web server framework provides access to the unparsed body.
Step 4: Retrieve the Public Key
Fetch the JSON Web Key Set (JWKS) from our public endpoint: https://api.shipengine.com/jwks
The JWKS endpoint returns a standard RFC 7517 JSON Web Key Set containing our public keys. Find the key in the JWKS whose kid (key ID) matches the x-shipengine-rsa-sha256-key-id header value.
The set of keys does not change very often, so it is generally safe to cache
the JWKS response for a long period of time. If you receive a webhook request
with a x-shipengine-rsa-sha256-key-id value that is not in your cached copy,
you should fetch the latest JWKS. The response includes an ETag header, which
you can pass in subsequent requests via the If-None-Match
header. If the contents hasn't changed, our JWKS endpoint will respond with status 304.
If it responds with a status 200, it means the JWKS has changed, has a new ETag,
and you should update your cache.
ShipStation may periodically rotate our signing keys. As long as you follow these guidelines related to fetching the JWKS, you should not have any service interruption. A public key will always be present in the JWKS before we start using it for signing outgoing requests.
Step 5: Verify the Signature
To verify the signature, you must first construct the signed payload. This is
the value that was hashed using our private key to produce the signature.
The signed payload is constructed by concatenating the value from the timestamp
header, a literal period (.), followed by the raw request body.
Example:
Use an RSA SHA-256 validation function on this signed payload, along with the public key from the previous step, to verify the signature.
If the signature validation fails, you should respond with an HTTP status 401,
and discard the payload without any further processing.
Example
We've included a full working example of a NodeJS server that receives and validates webhooks, so that you can use it as a reference in your own implementation.
Webhook Payloads
Example payloads for each type of webhook are provided below. You can expect to receive a message with the same structure as these examples whenever you subscribe to the corresponding event. You'll notice that each payload includes a resource_type and a resource_url. Some payloads will contain additional information as well.
When ShipStation API dispatches a webhook, we allow 10 seconds for you to acknowledge you have successfully received the payload (your listener should return a 2xx response to us). If we don't receive an acknowledgement within 10 seconds, the system will put the payload back into the queue and make a maximum of two additional attempts to dispatch the given payload. These attempts are typically separated by 30 minutes. However, this can swap to other timing intervals under certain conditions. If all three attempts receive no response, the event will be removed from the dispatch queue.
Example Batch Event Payload
Example Track Event Payload
INFO:
Event Timestamps
carrier_occurred_atis the timestamp of the event received from the carrier. It is assumed to be the local time of where the event occurred. Please note that this event property is not yet fully supported across all carriers.occurred_atis the UTC based time of the event's occurrence.